Folding Diagrams for the
Jack-O-Lantern: (All 26 Steps)

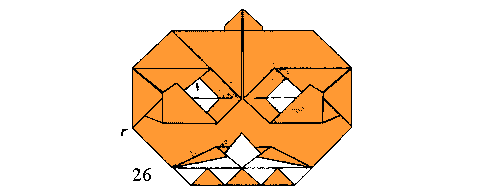
Finished Jack-O-Lantern Finished Jack-O-Lantern by Louise Cooper.
Drawn by Terry Hall from hand sketches by Phyllis Snyder.
Formatted for the web by Jasper Paulsen.

The flat Jack-O-Lantern is a low-intermediate model that takes 5-10 minutes to make.
A 6 " (15 cm) square makes a 3 " x 3 " (8 cm x 7 cm) flat model.
The flat Jack-O-Lantern instructions are quite detailed.
If they give you any difficulty, please let me know.

The 3-D Jack-O-Lantern is an intermediate model that takes 10-20 minutes to make.
A 6 " (15 cm) square makes a 2½ " x 2 " x 1¼ " (5 cm x 2½ cm x 3 cm) 3-D model.


An Outline of the Diagrams:


The Diagrams:

Diagrams for steps 1-3.
  1. Start with a square, white side up. Valley fold.
  2. Valley fold and unfold.
  3. Valley fold the two sides down.
Diagrams for steps 4-7.
  1. (Enlarged view.)
    Fold and unfold the two points.
  2. Fold one side up and squash fold. Repeat on the other side.
  3. Mountain fold the top. Turn over.
  4. Crimp fold both sides to form the "stalk".
Diagrams for steps 8-11.
  1. Finished stalk looking from the back side. Turn over.
  2. Valley fold the top layer only.
  3. Mountain fold in half.
  4. (Enlarged view of circled area only.)
    Make the valley folds shown, and fold as shown in Step 12.
Diagrams for steps 12-15.
  1. Completed folds.
  2. Valley fold the top down to cover the two center triangles only.
  3. Valley fold the top layer up at the center line.
  4. Valley fold and unfold as shown.
Diagrams for steps 16-19.
  1. Lift up the top, leaving the fold shown intact.
  2. Valley fold both sides down.
  3. Valley fold the top down as shown, allowing the "nose" to come into position.
  4. Completed move of step 18 showing "nose".
Diagrams for steps 20-21.
  1. (Reduced view, showing the whole model.)
    Valley fold the right hand side as shown.
    (Note that the point does NOT go all the way to the center of the model.)
  2. Valley fold the top down to the center line.
Diagrams for steps 22-23.
  1. Valley fold the bottom up past the center line.
  2. Make a crimp fold where shown.
Diagrams for steps 24-25.
  1. Valley fold the corner as shown.
  2. Step 24 completed. Tuck the corner marked with a *
    under the flap made in Step 23 to lock.
    Repeat Steps 20-25 on the left hand side.
Diagram for step 26.
  1. The finished (flat) Jack-O-Lantern.
    The mouth and upper lip can be changed
    to suit your personal tastes.

Optional directions for making a 3-D model:

  1. Unfold step 25 on both sides.
  2. Unfold the bottom of the mouth. (Undo step 11.)
  3. Valley fold and unfold the bottom of the mouth
    where it touches the top of the mouth.
  4. Pleat the face (behind the upper lip),
    so that the tip of the nose is at the center of the paper.
  5. Valley fold the sides of the paper in toward the center.
    Each crease should run from the middle of the orange diagonal
    at the top of the paper to the tip of the crease made in Step 29.
  6. The eyes should be mostly covered. Unfold.


  7. Unfold the stalk. (Undo steps 6-8.)
  8. Reach into the model, and separate the back layer
    from the rest of the model.
  9. There is a long crease on the back side of the model.
    This crease used to be the top edge of the model.
    Viewed from the outside, this crease used to be a valley fold.
    Change this crease to a mountain fold.
  10. Remake the stalk, while open-sinking the top of the model.
  11. Open out the back of the model, and expand the sink to taste.
    (I like to keep the left and right corners of the sink
    in the same places, but make the back corner of the sink
    50% bigger, and the front corner twice as big.)
  12. (The model is now 3-D.)
    The forehead should be a little above the eyes.


  13. Redo Step 31. (Fold in the left and right flaps.)
  14. (On the right side.)
    With a finger inside the model, round the corner,
    and crimp the top edge of the new flap.
  15. Tuck the new flap behind the eye.
  16. If any white is showing along the left edge of the new flap, valley fold to hide the white.
  17. Repeat Steps 41-43 on the left.


  18. Shape the lower jaw to be the base of the model.
  19. Shape the lower lip to taste.
  20. The 3-D Jack-O-Lantern is finished.

Navigational Assistance:


[ Home page | Origami Menagerie | Instructions | Comments ]

The flat Jack-O-Lantern was designed by Louise Cooper. Drawn by Terry Hall from hand sketches by Phyllis Snyder. Formatted for the web by Jasper in 2001. 3-D Jack-O-Lantern was designed by Jasper in 2001. Copyright 1995-99, 2001 by Jasper (aka John Paulsen), Louise Cooper, Terry Hall, and Phyllis Snyder. Your comments are welcomed.
Last updated November 19, 2005.